
Incline Push-Up (On Box)
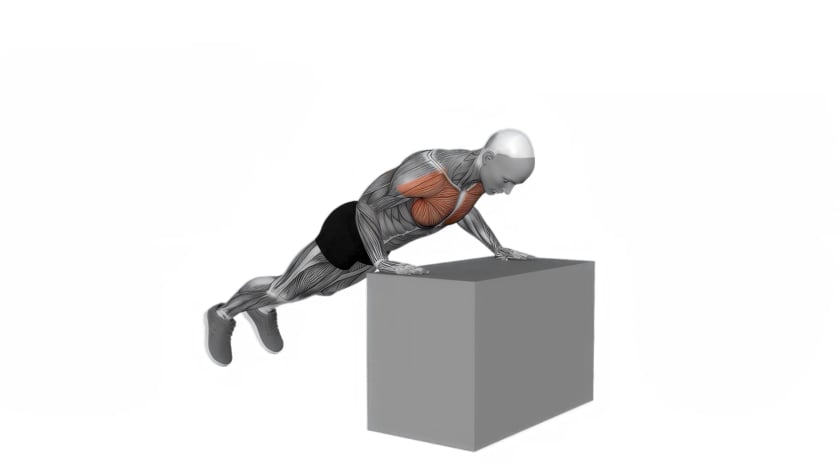
The Incline Push-Up (On Box) is a beginner-friendly variation of the traditional push-up performed with the hands elevated on a stable box or similar raised surface. Elevating the upper body reduces the percentage of body weight that must be pressed, making the exercise an excellent way to develop the strength and movement control needed for a standard floor push-up. NASM specifically classifies the incline push-up as a beginner exercise and a foundational progression toward a full push-up.
The exercise primarily works the pectoralis major and triceps, with assistance from the anterior deltoids, serratus anterior and core stabilizers. Because the body must remain aligned throughout the movement, the abdominal and other core muscles also work to stabilize the torso.
As demonstrated in the uploaded video, the hands are placed on a stable elevated box while the feet remain on the floor. The body is maintained in a straight position while the chest is lowered toward the box and then pressed back to the starting position.
How to Perform
Stand facing a stable box or elevated platform and place both hands securely on the surface, slightly wider than shoulder width.
Step your feet backward until your body forms a straight line from your head through your shoulders, hips and heels.
Brace your abdominal muscles and maintain a neutral spine. Keep your shoulders positioned back and down rather than allowing them to shrug toward your ears.
Slowly bend your elbows and lower your chest toward the box. Keep the elbows angled approximately 45 degrees away from your torso rather than allowing them to flare directly outward.
Lower yourself as far as you can comfortably while maintaining proper body alignment and control.
Press firmly through your hands and extend your elbows to raise your body back toward the starting position.
Maintain the straight body position throughout the entire repetition rather than allowing your hips to sag or rise independently.
Repeat for the desired number of repetitions using a smooth, controlled tempo.
Tips
Choose a box height that allows you to perform the exercise with proper form. A higher surface generally makes the push-up easier, while progressively lowering the surface increases the amount of body weight being supported by the upper body and makes the exercise more challenging.
Make sure the box or platform is stable and will not slide or move during the exercise.
Keep your abdominal muscles engaged throughout the movement and think of your head, shoulders, hips and heels moving together as one unit.
Position your hands slightly wider than shoulder width and keep them securely planted on the box.
Keep the elbows angled slightly back rather than allowing them to flare straight out to the sides.
Lower your body under control. Avoid dropping toward the box or using momentum to push yourself upward.
Use a comfortable range of motion. As strength and control improve, gradually work toward bringing the chest closer to the elevated surface.
Benefits
The Incline Push-Up strengthens the chest, triceps and shoulders while also challenging the muscles responsible for stabilizing the torso. It provides many of the fundamental movement benefits of a traditional push-up with less resistance.
For beginning exercisers, one of its most important benefits is scalability. NASM identifies incline push-ups as an appropriate starting variation for clients who are developing the strength and movement competency required for standard push-ups.
The exercise also provides a simple progression system. A beginner can start with the hands on a relatively high surface and gradually use lower surfaces as strength improves. Eventually, the exerciser may progress to performing push-ups with the hands and feet on the floor.
Because the exercise uses body weight for resistance, it requires very little equipment and can be performed in many training environments.
Common Mistakes
Allowing the hips to sag is one of the most common errors. This usually occurs when the core is not adequately engaged and can cause the body to lose its proper alignment.
Raising the hips too high is another common compensation. The head, shoulders, hips and heels should remain reasonably aligned throughout the movement.
Allowing the elbows to flare excessively outward can place unnecessary stress on the shoulders. NASM recommends keeping the elbows approximately 45 degrees from the torso during the movement.
Performing the exercise too quickly or using momentum reduces control and makes it more difficult to maintain proper technique.
Using a surface that is too low can make the exercise unnecessarily difficult for a beginner. Start at a height that permits good form and gradually lower the hand position as strength improves.
Performing only a very short range of motion can limit the effectiveness of the exercise. Lower the chest toward the box as far as comfortably possible without losing body alignment.
FAQ
Safety Note
Always use a sturdy box or elevated surface that will not tip, slide or move while you are performing the exercise.
Maintain control throughout the movement and select a box height that allows you to keep your body properly aligned. Stop the exercise if you experience pain or unusual discomfort in your shoulders, elbows, wrists, chest or back.
If you have an existing spinal injury or chronic back pain, consult your physician or another qualified healthcare professional before performing this or any other exercise.